Introduction to Specific Topics in SAGA & LIS Pro 3D
What You Find in This Section
This is a curated list of topics that helps you deepen your understanding of how SAGA and LIS Pro 3D work.
- Standard GIS operations
- Setting spatial reference systems
- Creating shapes layers and digitizing polygons
- Running tools in LIS Pro 3D and SAGA GIS - common concepts
- Grid systems
- Relevance of grid systems
- In-memory processing and permanent saving of results
- Defining ranges
- Hierarchy of SAGA data types
- Point cloud data
- How to visualize a point cloud with LIS Pro 3D
- ASPRS LAS file format class identifiers (lookup table)
- Scripting
- How to retrieve the PySAGA function call from the SAGA GUI for copy-pasting
- Instructions for correct memory management
Standard GIS Operations
Setting Spatial Reference Systems
Sometimes datasets may be missing internal information about their spatial reference system. In such cases, you typically need to set a reference system manually. This can be done using the “Set Coordinate Reference System” tool, for both vector and raster data. The most convenient way to define a projection is by using its EPSG code. In the following example, we use EPSG code 2056. When you enter the code and hit ENTER, other parameters of the tool are updated accordingly (e.g., Definition String):
In all our tutorials, we describe the execution of individual tools via the Tools interface. If you are not familiar with executing tools this way, please consult this section in our introductory tutorial series. In this section, we describe how you can locate the tools in LIS Pro 3D’s GUI.
Tool: Set Coordinate Reference System
Geoprocessing: Projection // Tools: Projection → PROJ
| Parameter | Setting |
|---|---|
| Options | |
| Definition String | +proj=somerc +lat_0=46.95240555555556 +lon_0=7.439583333333333 +k_0=1 +x_0=2600000 +y_0=1200000 +ellps=bessel +towgs84=674.374,15.056,405.346,0,0,0,0 +units=m +no_defs |
| Display Definition as… | PROJ |
| Authority Code | 2056 |
| Authority | EPSG |
| Geographic Coordinate Systems | <select> |
| Projected Coordinate Systems | <select> |
| Well Known Text File | |
| Pick from Data Set | |
| Customize | |
| Data Objects | |
| Grids | |
| > Grids | No objects |
| Shapes | |
| > Shapes | 1 object (2716500_1241000) |
Finally add the datasets (to which the spatial reference should be assigned) to the “Shapes” and/or “Grid” parameters. Point clouds can be added to the “Shapes” parameter (see the section on Hierarchy of SAGA data types for an explanation why this is possible).
If you have created a map from a dataset without spatial reference, the map will also have no reference system set. You can set the spatial reference system of a map by choosing “Spatial Reference” after a right-click on the map in the “Maps” tab.
Especially with regional reference systems, it is advisable to double-check the projection parameters and, if in doubt, simply set them again. It is possible that some parameters are correctly set when a dataset is loaded, but other components, such as +towgs84=…, might be missing in the file. With the projection used here (EPSG:2056), this could result in a dataset being offset by a few meters. Such cases can also be checked against a base map.
Creating a New Shapes Layer to Digitize Polygons
Quickly digitizing an area of interest is probably one of the most common manual tasks. Creating and editing a layer involves a number of steps in SAGA GIS:
Create a new polygon shapes layer with the Create New Shapes Layer tool
Add the layer to a map
Select the Interact tool in the toolbar (the button with the black mouse cursor)
Make sure the new shapes layer is (still) selected in the Data tab
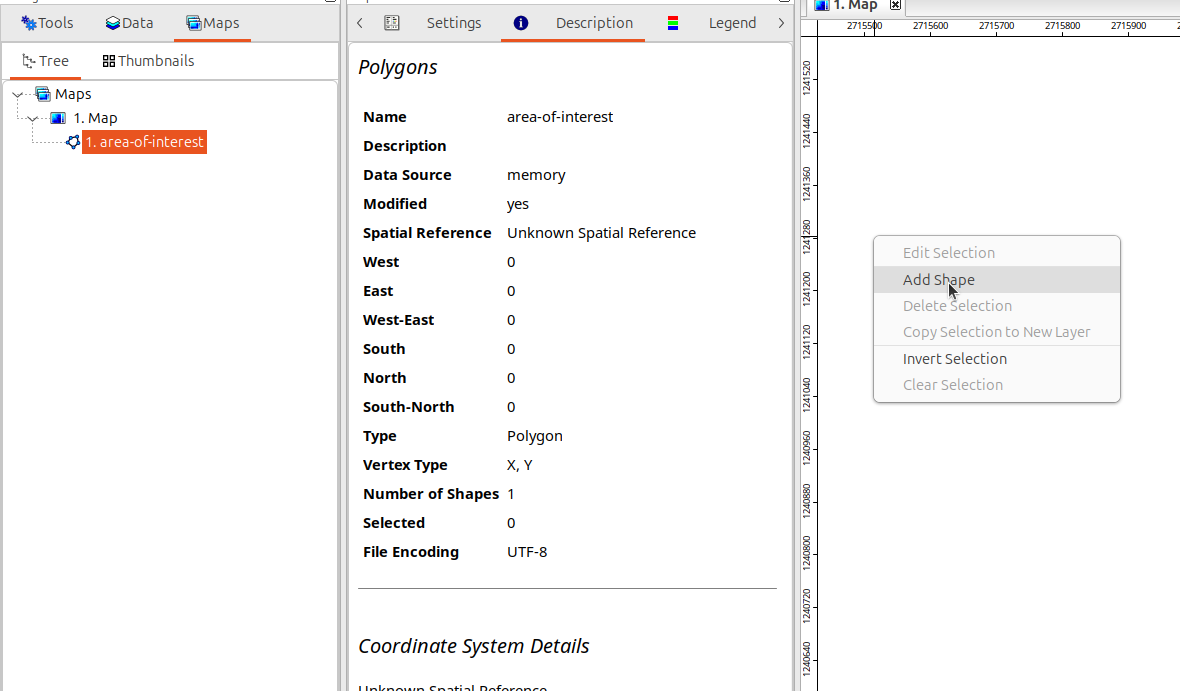
In the map, right-click and select Add Shape from the context menu
Digitize a polygon by adding vertices with left-click, stop digitizing by a right-click
Finalize edits: perform another right-click in the map and uncheck Edit Selection in the context menu (note: on Windows systems, you can press the SPACE bar as a shortcut)
Last but not least: do not forget to save the dataset to disk, it is still only im memory
Create New Shapes Layer:
Tool: Create New Shapes Layer
Geoprocessing: Shapes → Construction // Tools → Shapes → Tools
| Parameter | Setting |
|---|---|
| Data Objects | |
| Shapes | |
| << Shapes | Shapes |
| Options | |
| Name | area-of-interest |
| Geometry Type | Polygon |
| Vertex Type | x, y |
| Number of Attributes | 2 |
| Attributes | 4 parameters |
Adding a Polygon:
Finishing a Polygon:
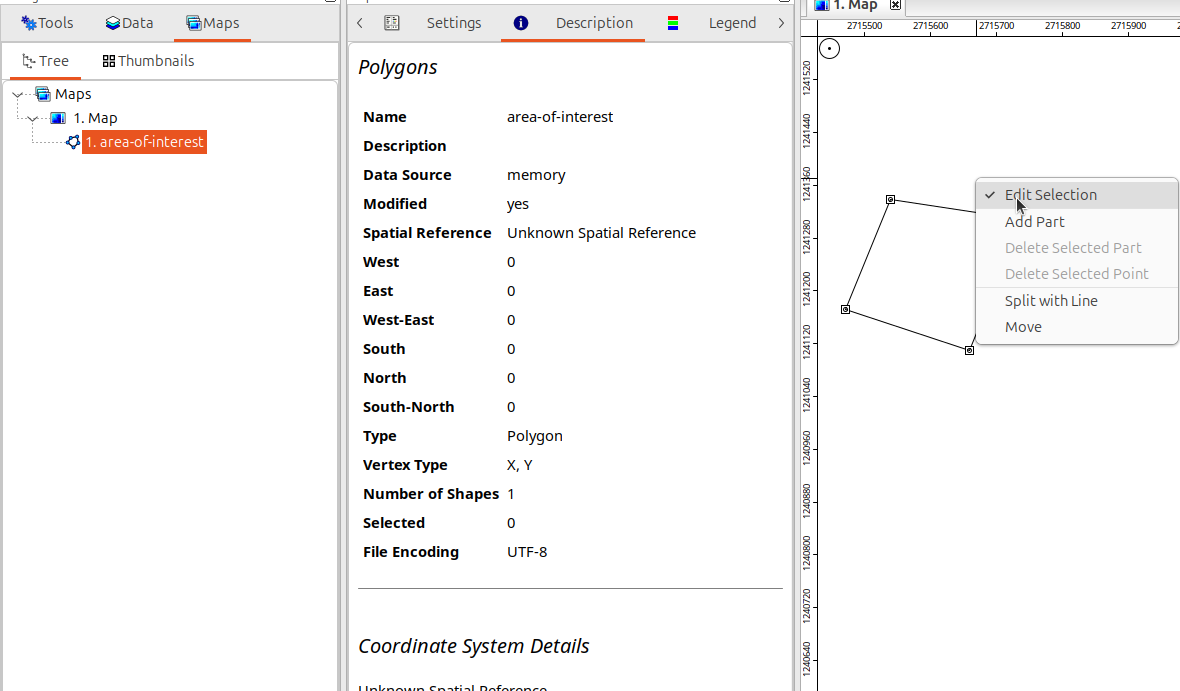
Other Editing Operations:
- Enter editing mode: select a polygon (left-click), then right-click and select “Edit Selection”
- Move polygon vertices: left-click on a vertex and drag it to the new position
- Delete polygon vertices: left-click on a vertex to select it, then press the DEL key (or use the context menu)
Operations Available on Selections:
When you have one or more polygons selected, do a right-click in the map to …
- Delete Selection
- Invert Selection
- Clear-Selection
- Copy Selection to New Layer
Have a look at the general description for maps for an overview on all keyboard shortcuts and mouse operations in a map: change to the “Maps” tab in the “Manager” window, select “Maps” top-left in the tree and switch to the “Description” tab of the “Properties” window.
Running Tools - Common Concepts
Grid Systems
In SAGA GIS, grid systems are a fundamental concept for managing raster data. A grid system is defined by the lower-left coordinate of the system (referencing the grid cell node), the cell size, and the number of rows and columns.
Tools that create new raster layers with an unknown output grid system provide so-called “Target Grid System” parameters. Here, you can choose between “grid or grid system” and “user defined.” The first option allows you to specify an existing grid system or raster dataset as a template for the new grid system. The second option allows you to define all properties manually. Typical operations that require defining a target grid system include resampling raster data to a different resolution or gridding a point cloud.
Many tools in SAGA GIS require that two or more grids used in the same computation share the same grid system. One such tool is “Grid Difference”, which calculates the difference between two grids. In contrast to some other GIS software, SAGA GIS requires the user to ensure that raster datasets are properly aligned before performing analyses. This is intentional: no resampling is performed automatically in the background without the user’s knowledge.
By carefully choosing the appropriate grid system from the beginning, you can eliminate or minimize resampling operations in larger workflows and thereby prevent further degradation of data quality.
Option 1: Setting “Target Grid System” with Option “grid or grid system”
In the GUI, this option allows you to use the grid system of an existing grid as a template. In such cases, a dropdown list lets you select from one or more available grid systems.
In Python scripting, you can provide the grid system of another grid as the target like this:
from PySAGA.tools import lis_conversion

template_grid = saga_api.SG_Get_Data_Manager().Add_Grid(<path-to-saga-grid>)

# input data object
pc_in = saga_api.SG_Get_Data_Manager().Add_PointCloud(<path-to-saga-point-cloud>)
# output data object
output_grid = saga_api.SG_Get_Data_Manager().Add_Grid()

lis_conversion.Point_Cloud_to_Grid(
    PC_IN=pc_in,
    output_grid=output_grid,
    ... other options ...
    TARGET_DEFINITION='grid or grid system',
    TARGET_SYSTEM=template_grid.Get_System().asString()
)
Option 2: Setting “Target Grid System” with Option “user defined”
Please note that everything in this section assumes you are working in a projected coordinate system that uses cartesian coordinates (in contrast to a geographic coordinate system with spherical coordinates).
“User defined” requires you to carefully choose the tool parameters. As a basic setting, we recommend setting “Fit” to “cells” (which corresponds to pixel-is-area, in contrast to pixel-is-point, which would be “nodes”). “Cells” will align the boundaries of your grid cells with the extent (west, east, south, north) that you specify. There is also an option called “Fit”, which rounds the extent coordinates to whole numbers for cell sizes without decimal places. When you provide the exact extent, we recommend keeping this option turned off.
Other than that you can choose between a couple of options for setting the parameters:
Example 1. Set Cellsize and Extent (West, East, South, North)
You choose a cellsize and explicitly define the corner coordinates of your grid system. If you are completely free to define a new grid system, we recommend to choose corner coordinates that align nicely with your cell size. For example, for a cellsize of 0.5 (m) we recommend to choose values for West of 12300.5 or 12300.0 rather than 12300.12132351 (and likewise for East, North and South). The number of rows and columns of your grid system will be calculated automatically from the extent and cellsize.
Scripting example:
from PySAGA.tools import lis_conversion

# input data object
pc_in = saga_api.SG_Get_Data_Manager().Add_PointCloud("data object file")

# output data object
output_grid = saga_api.SG_Get_Data_Manager().Add_Grid()

lis_conversion.Point_Cloud_to_Grid(
    PC_IN=pc_in,
    output_grid=output_grid,
    ZFIELD="Z",
    METHOD="n",  # generate point density grid
    TARGET_DEFINITION="user defined",
    TARGET_USER_SIZE=0.500000,  # cellsize
    TARGET_USER_XMIN=0.000000,
    TARGET_USER_XMAX=100.000000,
    TARGET_USER_YMIN=0.000000,
    TARGET_USER_YMAX=100.000000,
    TARGET_USER_FLAT=False,  # auto rounding turned off
    TARGET_USER_FITS="cells",  # pixel-is-area
)
Note: West, East, South, North correspond to TARGET_USER_XMIN, TARGET_USER_XMAX, TARGET_USER_YMIN, TARGET_USER_YMAX here.
Example 2. Only set “Cellsize”
This is the simplest case. You only need to specify a cell size; all other parameters (extent, rows, and columns) are estimated from the input data and set automatically. We generally recommend this option only for quick, exploratory visualization of datasets that will not be processed further. This typically produces extents that are unwieldy and do not align well with other gridded datasets or tiling schemes.
In-memory Processing and Saving of Results
SAGA GIS and LIS Pro 3D load datasets into memory for processing. After running a tool (e.g., point cloud segmentation, ground classification, etc.), the result is held in your computer’s memory (RAM). Note: No data is permanently saved to disk at this stage. Any datasets you want to keep after closing SAGA GIS or LIS Pro 3D must be explicitly saved to disk. This applies both when running tools in the GUI and when scripting with Python.
Defining Ranges
Some SAGA GIS and LIS Pro 3D tools require the user to provide a value range using a range parameter. When running these tools via Python, a string in the form "<min-value>;<max-value>" must be passed to the parameter. Below the LIS Pro 3D tool Get_Subset_from_Virtual_LASLAZ is used to show how to set such values:
from PySAGA.tools import lis_virtual

path_to_virtual_las = ...
pc_out_list = (
    []
)  # Python list, will become filled after successful execution with output data objects of type 'saga_api.CSG_PointCloud'

lis_virtual.Get_Subset_from_Virtual_LASLAZ(
    PC_OUT=pc_out_list,
    FILENAME=path_to_virtual_las,
    COPY_ATTR=True,
    CONSTRAIN_QUERY=True,
    ATTR_FIELD="classification",
    VALUE_RANGE="1; 10",
    AOI_XRANGE="0; 1000",
    AOI_YRANGE="2000; 3000",
    METHOD_CLIP="lower and left boundary is inside",
)
In the code-snippet, the following properties are set as range parameters:
| Parameter | Value | Effect |
|---|---|---|
VALUE_RANGE |
'1; 10' |
Only extract points with class identifiers between 1 and 10 |
AOI_XRANGE |
'0; 1000' |
Set xmin and xmax coordinates of the queried AOI to 0 and 1000 |
AOI_YRANGE |
'2000; 3000' |
Set ymin and ymax coordinates of the queried AOI to 2000 and 3000 |
Hierarchy of SAGA Data Types

SAGA GIS (and hence LIS Pro 3D) data types are based on a simple inheritance scheme. It is important to understand that data types further down in Figure 1 inherit their behavior and methods from data types higher up. This means that both CSG_Shapes and CSG_PointCloud are special cases of CSG_Table, and that CSG_PointCloud is a special case of CSG_Shapes.
This is one of SAGA GIS’ hidden features. It means that any tool expecting a data type higher up in the hierarchy can also accept and process derived data types further down the hierarchy. For example, a tool (whether used in the GUI, command line, or Python interface) that requires a table as input will also accept shapes, point cloud, or TIN objects for the same parameter. However, be aware that not all tools preserve the input data type. For instance, providing a point cloud to a tool that accepts a table as input does not guarantee that the output will still be a point cloud. Depending on the tool’s design, the result may instead be a generic table object.
Point Cloud Data
ASPRS LAS File Format Class Identifiers
Below you can find a list of the ASPRS Standard Point Classes (Source). The values often need to be supplied to tools, e.g., when filtering out specific classes or restricting processing to specific classes only.
| Class | Value |
|---|---|
| Created, never classified | 0 |
| Undefined | 1 |
| Ground | 2 |
| Low Vegetation | 3 |
| Medium Vegetation | 4 |
| High Vegetation | 5 |
| Building | 6 |
| Low Point (noise) | 7 |
| Reserved | 8 |
| Water | 9 |
| Rail | 10 |
| Road Surface | 11 |
| Reserved | 12 |
| Wire - Guard (Shield) | 13 |
| Wire - Conductor (Phase) | 14 |
| Transmission Tower | 15 |
| Wire-structure Connector (e.g. Insulator) | 16 |
| Bridge Deck | 17 |
| High Noise | 18 |
Scripting
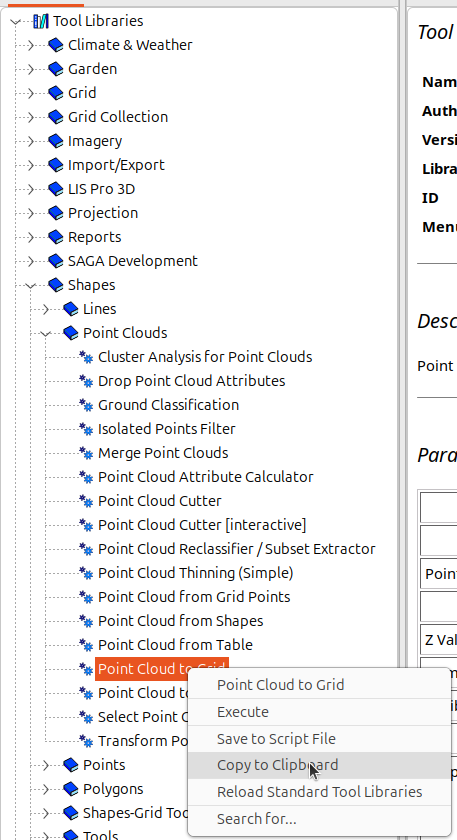
Copy to Clipboard - Scripting-Ready Tool Calls From the GUI
The “Copy to Clipboard” functionality offers a convenient way to get copy-paste ready tool calls for use in different scripting environments (bash / batch / Python) or SAGA toolchains.
Choosing the Type of Tool Call
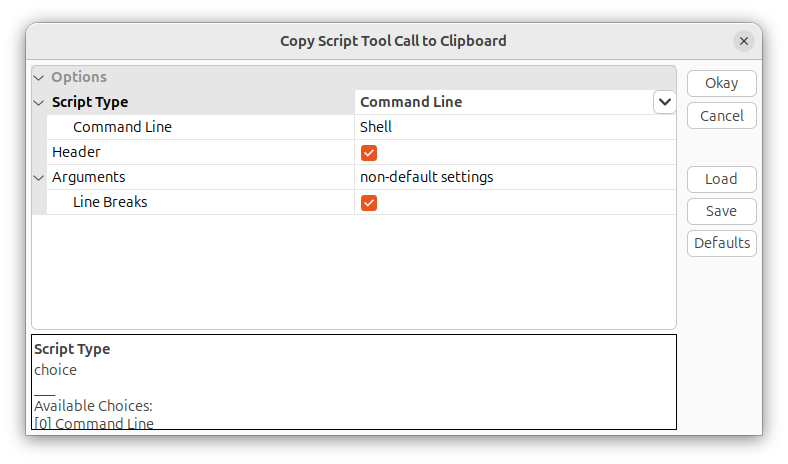
“Script Type” allows you to choose between four different output targets. The other parameters will adapt based on your selection:
- Command line - tool call for shell or batch scripts
- Tool chain - tool call for xml-based tool chains
- Python - tool call for Python scripting with different options - available via “Python Format”:
- Wrapper Function Call
- Wrapper Function
- Tool Settings and Call
- Markdown - tool settings as Markdown table for documentation purposes
If you are automating SAGA GIS or LIS Pro 3D tools with Python, you likely want to choose the following settings when copying to clipboard:
| Parameter | Setting |
|---|---|
| Script Type | Python |
| Python Format | Wrapper Function Call |
| Function Format | name |
| Header | 🗹 |
| Arguments | all settings |
| Line Breaks | 🗹 |
Memory Management in Python Scripting
Every object that is loaded or created in a script needs to be either manually deleted at some point within the workflow or at the end of the scripting session. Usually you make use of SAGA’s data manager for memory management.
Generally, there are two calls that let you free memory for objects that are no longer needed:
from PySAGA import saga_api

... add objects to the data manager ... # see below for examples

# this deletes only <some-object>, whatever that points to!
saga_api.SG_Get_Data_Manager().Delete(<some-object>)

# this deletes all objects managed by the data manager
saga_api.SG_Get_Data_Manager().Delete()
Case #1: Create Object via Data Manager, Free Memory at the End of Session
from PySAGA import saga_api

# load shapefile via data manager
shape = saga_api.SG_Get_Data_Manager().Add_Shapes(<path-to-shapefile>)

... perform processing ...

# since you loaded the shapefile via the data manager
# the data manager is aware if its existence
# calling .Delete() will free the memory of all objects, including "shape"
saga_api.SG_Get_Data_Manager().Delete()
Case #2: Explicitly Add Object to Data Manager, Free Memory at the End of Session
This is strictly necessary for objects that are created by tools outside of the data manager, e.g., for tools that fill empty Python lists with SAGA objects:
from PySAGA import saga_api, lis_cmd
from PySAGA.tools import lis_virtual

# empty Python list that will be filled with saga point cloud object(s)
pc_out_list = []

if not lis_virtual.Get_Subset_from_Virtual_LASLAZ(
    PC_OUT=pc_out_list,
    FILENAME=<path-to-virtual-las>,
    ...
)

# if the tool call succeeded, pc_out_list usually holds exactly one element (one point cloud object)
# at this point however, the data manager is not aware of the existence
# of anything inside pc_out_list!

# therefore, we need to manually add the point cloud object
# so that the data manager can access the object
pc_buff = saga_api.SG_Get_Data_Manager().Add(pc_out_list[0]).asPointCloud()

... perform processing ...

# free the memory
saga_api.SG_Get_Data_Manager().Delete()
Case #3: Create Intermediate Object and Free Memory as Soon as the Object Is No Longer Needed
Sometimes, you will create objects that are just required for some processing steps in your workflow. These should be deleted as soon as they are no longer needed to save memory resources.
from PySAGA import saga_api, lis_cmd
from PySAGA.tools import lis_virtual

# empty Python list that will be filled with saga point cloud object(s)
pc_out_list = []

if not lis_virtual.Get_Subset_from_Virtual_LASLAZ(
    PC_OUT=pc_out_list,
    FILENAME=<path-to-virtual-las>,
    ...
)

pc_buff = saga_api.SG_Get_Data_Manager().Add(pc_out_list[0]).asPointCloud()

... perform processing that involves pc_buff ...

# you successfully processed pc_buff and no longer need access to the data object
# (but continue your worklfow with other datasets)

# therefore we here only free memory for pc_buff (but not for any other objects!)
saga_api.SG_Get_Data_Manager().Delete(pc_buff)

... perform further processing ...
Case #4: Manage the Data Object Without the Data Manager
In case a data object was created but not added to the data manager, you must delete the object yourself with the SG_Data_Object_Delete() function as shown below:
from PySAGA import saga_api, lis_cmd
from PySAGA.tools import lis_virtual

# empty Python list that will be filled with saga point cloud object(s)
pc_out_list = []

if not lis_virtual.Get_Subset_from_Virtual_LASLAZ(
    PC_OUT=pc_out_list,
    FILENAME=<path-to-virtual-las>,
    ...
)

#
saga_api.SG_Data_Object_Delete(pc_out_list[0])